We have been searching high and low, testing day and night and we think we finally found the best FPV camera for RC cars that won’t break the bank.
Introducing Hawkeye Thumb 4k camera – currently our most recommended budget FPV camera for RC ground vehicles. The following explains the what, why and how.
What is Hawkeye Thumb 4K
In a nutshell, Hawkeye Thumb 4K is a small and lightweight camera that you could attach to your RC car for FPV purposes. It comes with digital HD recording (up to 4K resolution) plus a video out capability that empowers you to feed the video signal to an analog video transmitter and broadcast it to your FPV headset.
It is a close competitor to RunCam Thumb Pro, however, this nemesis has no video out. This means if you were to use the RunCam variant, you’d still need another analog camera to send the signal to your FPV goggles. But with Hawkeye, you need only one camera unit.
The corporate company is based in China with an office in Hong Kong.
Below $100 Price Tag
It costs under $100 which makes it one of the most affordable and yet versatile FPV cameras in the market. The next closest camera that matches its features and size is the RunCam Split series but it costs above $100. Plus, Hawkeye Thumb comes with a better form factor than RunCam Split that protects your camera from external forces such as bumps and crashes.
Video Stabilization With Gyroflow
This is almost a must for RC cars that are perpetually imparted with vibrations from the ground. This FPV camera includes the open-source Gyroflow stabilization feature that helps to take care of the shakiness and jerkiness you would experience. Check out the video below that demonstrates the groundbreaking power of stabilization with Gyroflow.
Optional ND Filter to Remove Jello Effect
Digital camera recording does suffer from the jello effect due to the use of rolling shutter in today’s CMOS-sensor cameras. This Hawkeye camera uses a Sony CMOS lens that is susceptible to this issue. It’s best to mount this camera with adequate cushioning to reduce this effect but one option is to purchase the optional ND (neutral density) filter. It offers an ND16 capacity meaning it reduces the amount of light that enters the camera lens to 1/16 value without affecting the color or contrast of the video. This filter enables the shutter to remain open for a longer period thus reducing jello.
HD to 4K Digital Resolution
This device boasts a digital video recording capability from 1080p full HD to 4K in quality. Below is a sample of 4K footage from this camera.
Low Latency Analog Video Signal
The analog video feed is what you see when you are FPVing your RC, not the digital HD video. Hawkeye Thumb converts the digital video it shoots into analog and produces a TV video output that is transmitted to your FPV headset. Hawkeye claims to achieve a TV video out latency of only 0.04 seconds. From our tests, we could not feel any delay in the analog video feed that we received on our headset. They recommended NTSC format against PAL to minimize all latency.
This efficiency is critical particularly in RC racing because you want to ensure quick reaction time when you drive.
We are satisfied with the video quality of the analog feed. Below is an image comparing the different analog cameras we tested with their default settings. Hawkeye’s quality is comparatively close to RunCam Phoenix 2 where the former has a softer realistic view while the latter has a sharper but heavier tone.
Different Mounting Options
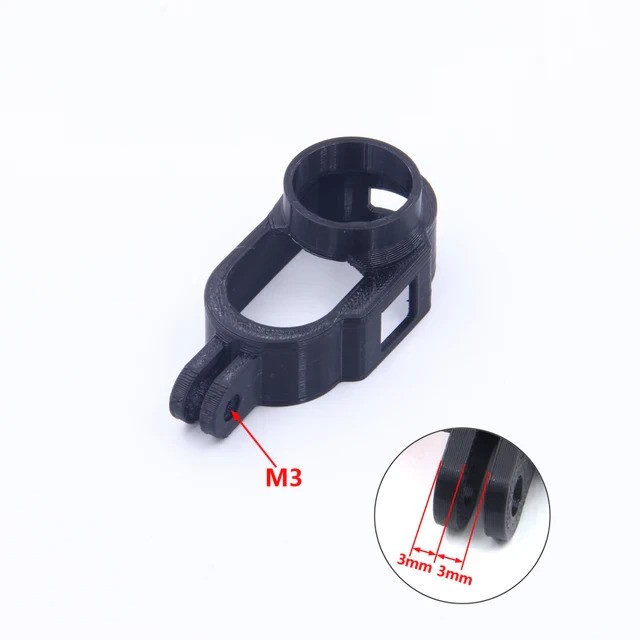
Unlike the drone fraternity, RC ground vehicles come in many shapes and sizes – buggies, trucks, cars and even motorbikes. But thanks to the image rotation function, you’re spoilt with choices on how you wish to attach this camera to your RC vehicle. Even though it comes with permanent M3-sized holes at the bottom of its case, you can easily flip the video orientation 180 degrees around to avoid using the M3 mount. You could even shoot in portrait style if you purchase a separate camera case that has mounting holes on its sides – especially for video shorts.
Comes with an OSD Keyboard
You could easily adjust the settings of this camera (such as image rotation) by using the OSD (on-screen display) keyboard that comes with the unit.
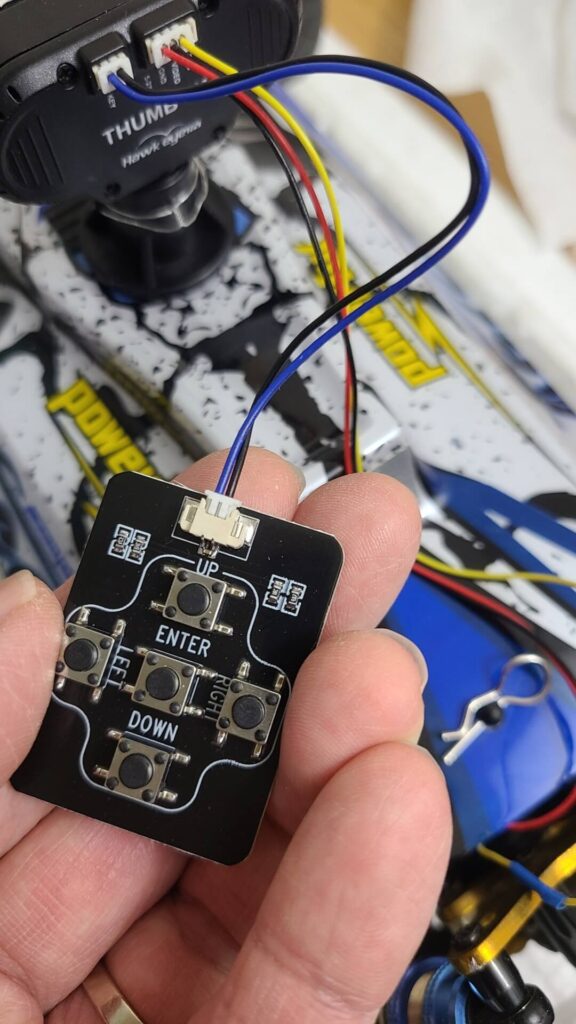
Just connect the keyboard cable to the back of the camera and power up. The manual comes with further instructions on how to interact with the settings menu using the keyboard. This generic keyboard is also compatible with other FPV cameras such as the RunCam Phoenix 2.
And Lots of LiPo Connectors
One big headache we often encounter during our installation process is having to match the right connectors with the right camera. Hawkeye took this pain away by including three different female JST-XH connectors with 2.54mm pitch for different LiPo battery capacities – 3s, 4s and 6s LiPos. The only connector missing is 2s. Using one of these standard connectors, you could directly power this camera from your LiPo charging leads.
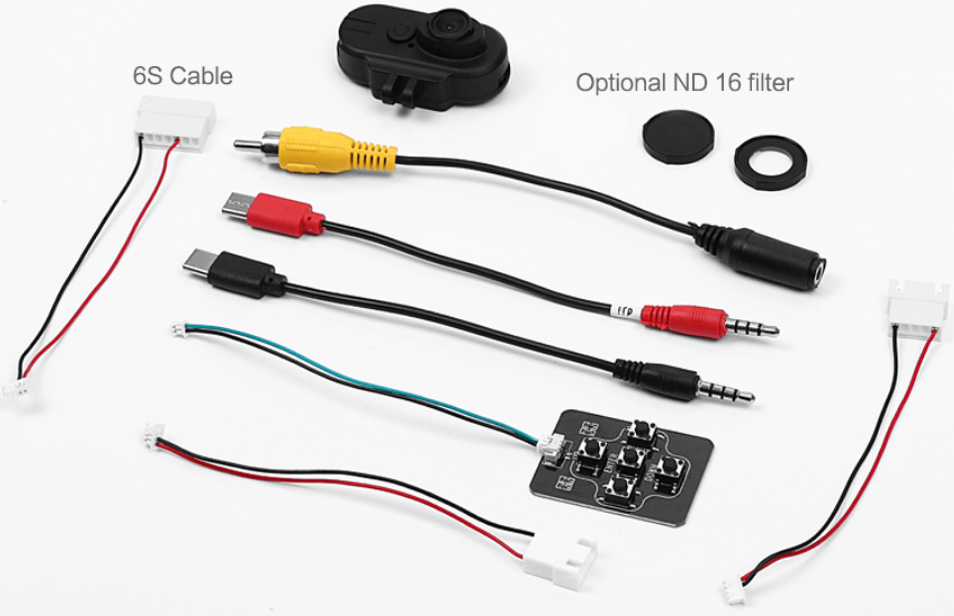
The only wiring work that you might have to undertake is connecting the video out cable from the camera to your video transmitter.
How About a Built-In Microphone
Nobody would care much about having a microphone if you’re flying a drone since you’d only be listening to the buzzing sound of the four propellers. But with an RC car, it is a must to hear your motor revving to get a sense of the realism of driving.
Fortunately, this Hawkeye Thumb unit is built with a microphone that brings your remote driving footage to life. However, this audio input only works in the digital recording mode and not when you’re FPVing.
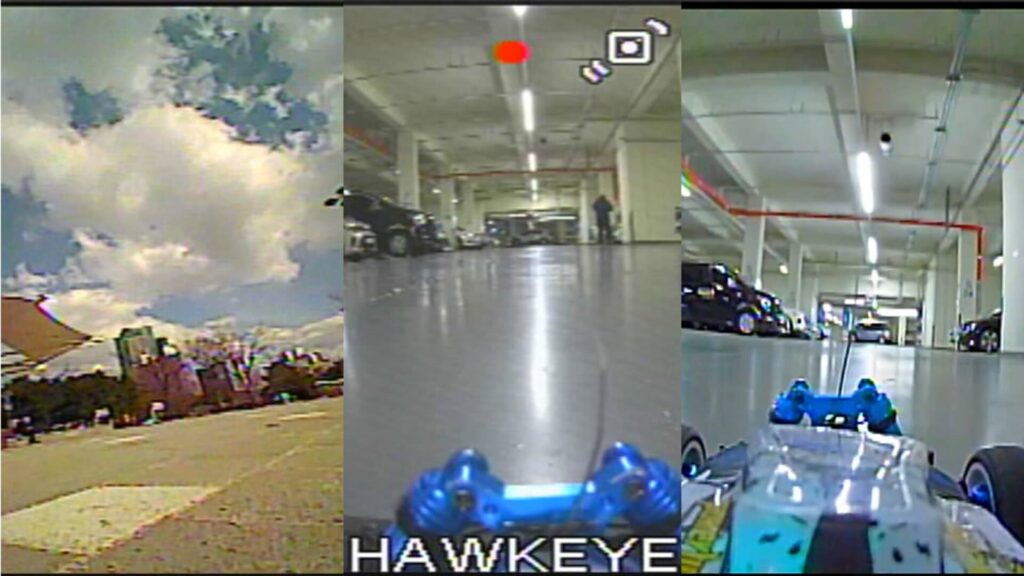
How to Mount Hawkeye Thumb 4K on RC Car
We used a Wltoys 124017 as our test RC car and decided to mount this nifty camera on the rooftop. We used a thrown-away part from a baby stroller as the housing which apparently fits the camera’s M3 legs perfectly. The images below show how we did it.
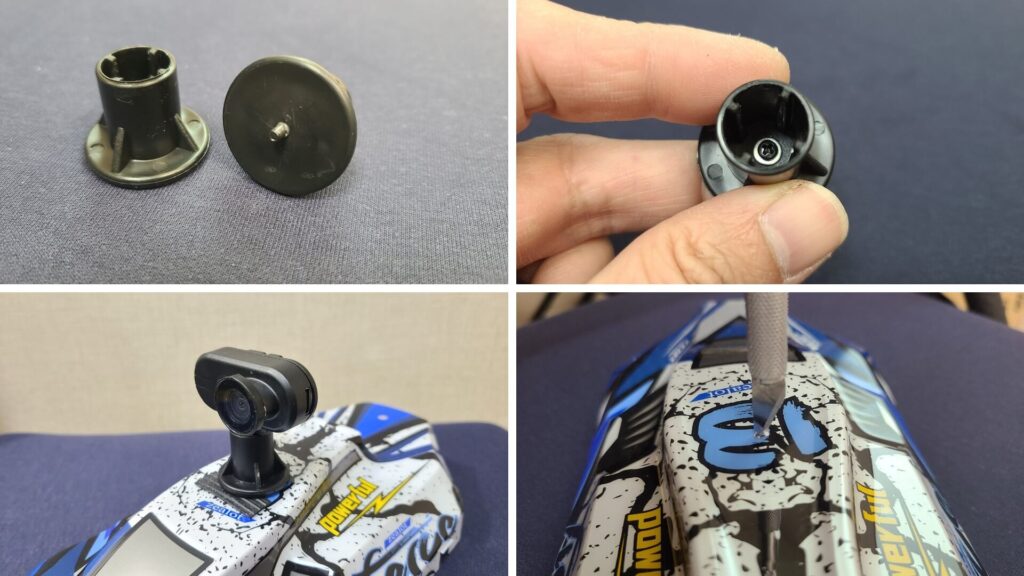
We wrapped the camera’s legs with a spare earphone rubber (not shown in the image) before we inserted them into the housing and added extra damping foam between the body shell and the body mount to absorb high-frequency vibration.
How to Connect to Video Transmitter
We used the EWRF TS5823 video transmitter with 600mW transmission output and the image below depicts where placed the transmitter on our RC buggy. We installed it behind the battery compartment and coupled it with a circular antenna instead of the stock linear antenna to get better reception. Read our other article that discusses in detail about this popular video transmitter.
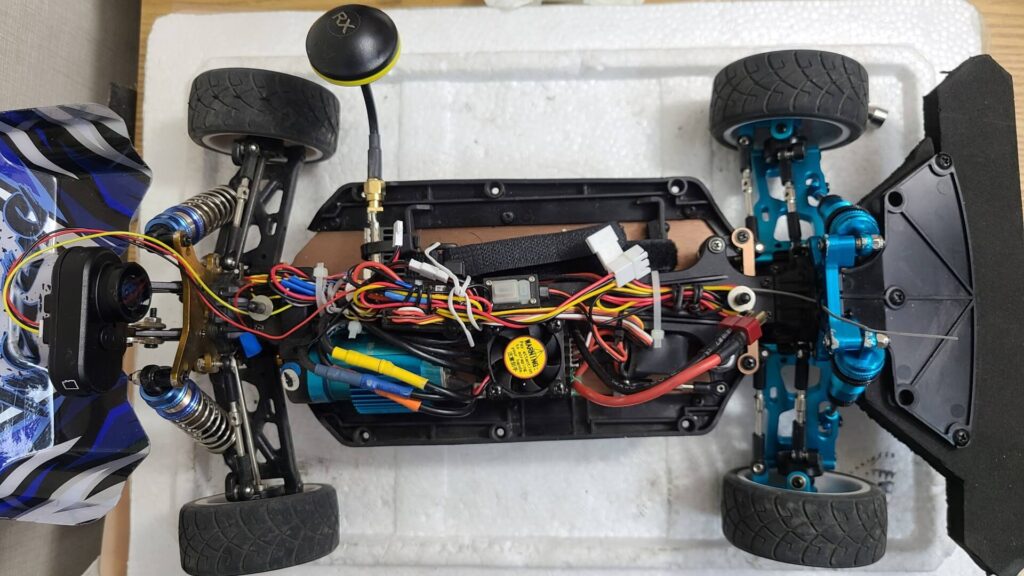
The video out (yellow wire) from Hawkeye Thumb goes to the video in port of the transmitter. That’s it. The rest of the wiring is for the power supply.
Make sure you use the same battery to power the Hawkeye Thumb 4K and your video transmitter with both connected to a common ground.
If you wish to tinker further, you can install an external 3-port microphone and feed the audio signal to the TS5823 audio input point. It would allow you to hear your RC engine roaring when driving with your FPV headset.
Some Caveats You Should Know
No product is perfect and that includes this FPV camera. One of the issues we encountered was in the micro SD compartment. The side opening for the SD card seems a little too big that any untrained fingers could mistakenly insert the card into the bottom of the SD card slot, missing the actual slot itself. And when this happens, you’re pretty much forced to unscrew the entire camera case to remove the stuck SD card.

We also experienced issues with different micro SD cards although both cards were manufactured by SanDisk and both look and feel the same. After all, they are both micro SD cards. We had no problem inserting one of the cards while the other card was problematic, to say the least. We needed to use a metal pin to further push the card inward until we heard the elusive “click”.
Yes, in order for the card to work perfectly with the camera, you must hear the “click” sound confirming that the card was inserted correctly. Otherwise, you will get the “memory card error” message on the headset display.
Our advice is to not remove the micro SD card from the slot and retrieve your video files via a USB cable connected to your PC.
Do not remove the micro SD card from the slot to avoid memory card issue. Instead, transfer your video files to your PC via a USB cable.
The other issue is with the input voltage. Even though it claims to accept an input of only 5V in their product specifications, it actually mentioned 5.5V on their manual. We tested with our 5V output from our video transmitter and it failed to power up this camera. So, the best option is to use your LiPo 7.4V or above as a power source.
The packaging includes two USB to 3.5mm jack AV cables and they are only meant to be used with DJI goggles and Hawkeye’s own monitors like Little Pilot. They don’t work with other FPV goggles such as Eachine EV800D. This is confirmed by the Hawkeye team.
So your other option to view the camera feed is to use your FPV headset wirelessly or connect the camera to a TV that accepts RCA input.
Finally, a Live Test on RC Car
Below is an RC buggy FPV video shot in 1080p resolution with Hawkeye Thumb 4K with Gyroflow. The quality is quite breathtaking.
As Closing, It’s Tough Enough for Ground RC
We have crashed our RC buggy multiple times with this camera flying off from the rooftop and it still works as new, albeit with unavoidable scratches. We feel this is a value-for-money FPV camera for any RC car owner who wants to turn their RC into an FPV machine.
This article comes with affiliate links to help us pay our website bills.