Here’s a detail explanation on how you could attach a camera on your RC car, buggy, truck, slash, or boat to capture your First Person View (FPV) moments. In general, you have two main options on FPVing – with live FPV video or without. This guide is based on certain criteria that we find essential to your FPV needs. They are,
- Cost-effectiveness
- Video quality
- Video image stability
- Ease of installation
With Live Video Feed to FPV Goggles
If you wish to add a camera to your RC vehicle while being able to drive it with live video feed, there are tonnes of choices you can select from. We shall explain how to do this from the cheapest and to be most expensive rig you can get in the market.
In the world of FPV, there are basically two sides of the system – analog FPV and digital FPV. We will not cover digital systems because digital rigs are often way more expensive than analog systems.
Use analog mini camera with built-in video transmitter
The first on our list is a simple and affordable option where you attach a small analog FPV camera to your vehicle that comes with a video transmitter. They are usually tiny in nature and the common ones in the market are Eachine TX0X series or Wolfwhoop WT0X series. The “X” denotes versions like TX02 or WT07. They are light and around the size of a US penny or one Euro coin and also very affordable, like under $20. But don’t expect the best video quality and they also don’t come with microphones.
Because they are meant for tiny rigs, they usually require low power like 3.7V and up. So, a small 1S lipo battery would suffice. You don’t need to do much wiring since the video transmitter is already wired to the camera. They probably come with just one set of cables with a connector – for power supply and optionally video output.
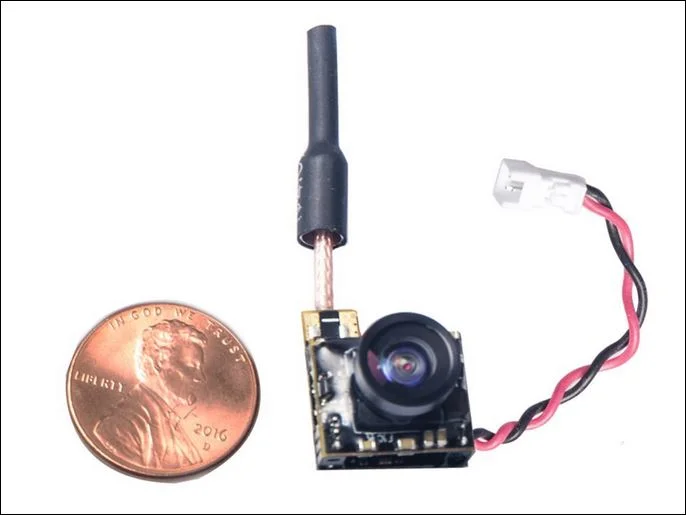
These cameras could go up to a distance of 600m or more according to drone pilots but on land, it’s a different story. Some claim a 200mW camera could only transmit a reasonable video signal for as far as 200m. Beyond that, the images will be very grainy. It hugely depends on your line of sight – the more objects you have surrounding your RC vehicle, the harder is it for the signal to pass through. Do note that there’s no image stabilization with these cameras. Thus, if you’re planning to bash your RC, expect jittery in your video.
They only work with FPV goggles and you could use any of these analog headsets as long as their frequencies (a.k.a. channels) are compatible. Essentially, the built-in video transmitter on the camera will transmit the video signal to your FPV headset and display it on the screen right in front of your eyes – just like your good old cathode-ray tube (CRT) TV sets. For an economical FPV goggles choice, you may consider Eachine EV800D, where “D” stands for built-in DVR recorder while the ones without do not support video recording.
Pros:
- Easy to set up
- Cheap (below $50) and lightweight
Cons:
- Poor video quality
- May need a separate 3.7V battery
Use analog mini camera with separate video transmitter
Since you’ll be running your FPV on a land-based (or water) RC vehicle, weight is not an issue. Thus, you could consider getting a camera that comes with a separate video transmitter which would weigh more than the built-in version. These transmitters are usually more powerful (above 200mW) hence offering further distance but they require higher voltage input. Below are a few popular options.
Runcam Split 4
Not to be confused with RunCam Split HD, this is a popular choice among FPV hobbyists. It comes in a set with two main components – the camera and the recording module. They are connected via a multi-wire cable. Don’t confuse the circuit board with the video transmitter. This product does not come with a transmitter and you need to include one in your setup.
Although RunCam Split4 is designed specifically for FPV drone flying, it works well for RC cars thanks to its small form factor and support for stabilization via Gyroflow. It supports high-quality 4K digital recording while simultaneously transmitting an analog video feed to the driver’s goggles or monitor via additional video transmitter. This allows for a more immersive driving experience while still providing high-quality footage for later viewing or editing. It could take in a microSD card (up to 128GB) and a power supply from 5V to 2V.
However, the video recording module does not come with a case. This is crucial since RC cars are often exposed to ground elements. And did I say this unit comes with microphone?
Pros:
- High-quality FPV camera with 4K digital recording capability and analog video output
- Works with most analog FPV goggles
- Comes with video stabilization via Gyroflow
- Small size and lightweight
- Includes built-in microphone
- Below $100
Cons:
- Soldering is required
- May require a separate power cable
- Does not come with a case except the camera
- Price may be an issue for some
Hawkeye Thumb 4K
This budget camera falls under the $100 mark and offers compelling features such as 4K digital recording, video stabilization via Gyroflow and more. It accepts up to 64GB micro SD card and power input from 5 to 23V. It could pass as a copy of RunCam Thumb Pro due to its similar packaging and features. It has most of what you get from the RunCam version except it is priced about $40 lower than its nemesis, which makes it very affordable. We published a separate complete guide for this nifty camera.
Unlike RunCam Thumb Pro, this 15.5g device can work as a 2-in-1 FPV and DVR camera where it records digital video while streaming live analog signal to your goggles. This is thanks to the video-out pin located at the back of the camera. You just need to connect the video-out to the video-in of a video transmitter. However, you do need a separate cable with a connector to connect the video out plug from the camera to transmitter. This cable is not included.
What makes this camera RC car-friendly is the adapter mounting legs (with M3 holes) that ease your installation process. You can just get a camera mount and glue it on your RC vehicle and connect the camera’s adapter to the mount. If you’re looking for something less permanent, use a velcro strap or duct tape instead of glue.
Another good news is it comes with an array of cables – 3 video output cables (2 X USB-C to 3.5mm headphone cable and 3.5mm female to RCA) and 3 power cables (for 3S, 4S and 6S batteries).
Pros:
- Record 4K digital video while transmitting an analog video signal to goggles
- Light and affordable (below $100)
- Comes with own case without adapter mounting legs
- Comes with a multitude of power cables to fit your 3S, 4S or 6S batteries (optionally purchased)
Cons:
- Need a separate cable with connectors to connect the video-out to a transmitter
Use separate camera and separate transmitter
This is a more flexible choice where you purchase a separate FPV camera and connect it with an independent transmitter. You just need to ensure that both units work together. An FPV camera usually comes with a “video out” wire that needs to be coupled with the “video in” port of the transmitter.
The disadvantage of this option is the need to do soldering or purchase a separate cable with the correct connector to interlink the two components together. This can be a hassle for FPV beginners since some may not have a soldering iron ready compounded with the fact that there is a headache list of connectors in the market. Most use JST connectors but JST alone comes with an array of types with different pinches (the millimeter distance between the center of one pin to the next pin).
Pros:
- Fully customizable
- Cost-effective since you can mix and match camera and transmitter that are within your budget
- Able to mount camera away from transmitter when space is a concern
Cons:
- May need to purchase additional wires and connectors
- Soldering is required
Use action camera like GoPro with video transmitter
You may already have an action camera stashed somewhere. So the first thing you might be wondering is if it’s possible to even use these good old cameras like GoPro for FPV. The simple answer is YES. But, the real answer is yes, but you need to do some wiring work.
As long as your camera has a video out terminal, you can access the video feed by connecting the signal to a video transmitter and broadcast it to your FPV goggles. One example is the video below that demonstrates how you can FPV a GoPro Hero camera.
In short, you need to connect a cable with a micro USB plug to the video-out of GoPro and link the other end of the cable to the video input of your video transmitter. This cable needs to be customized to fit your specific transmitter and camera.
As long as your action camera has a video out port, you should be able to FPV it. This includes Mobius camera, RunCam 2, and RunCam 5 camera which also have a micro USB video (and audio) output port. Just couple it with a video transmitter with the right cable connection.
If you choose this action camera FPV path, you will eventually kill two birds with one stone since the camera itself already has digital video recording. However, there might be some video latency where the analog video signal that you receive may be slightly delayed when it arrives on your goggles.
Pros:
- Make use of an action camera you already own
- Most come with video stabilization
Cons:
- Need to do customized wiring to connect video out from camera to transmitter
- An expensive option if you don’t already own an action camera
- Crashing your RC car might hurt your precious camera
With Live Video Feed to Smartphone via UVC Receiver
If you don’t have a pair of FPV goggles and not keen to invest in one, all hope is not lost. All you need to do is pick an option of FPV video feed listed above and use a UVC (USB video device class) receiver that connects to your mobile phone to view your video.
It’s quite simple to set up. The video below offers a guide on how to connect a Skydroid UVC receiver with an Android mobile phone. You just need to connect your smartphone to the receiver using the cable provided and install the specific mobile app that enables you to watch your FPV video feed. When your FPV video is transmitting, you should tune in to the right channel and voila, you got video on your phone!
Without Live Video Feed But With Video Recording
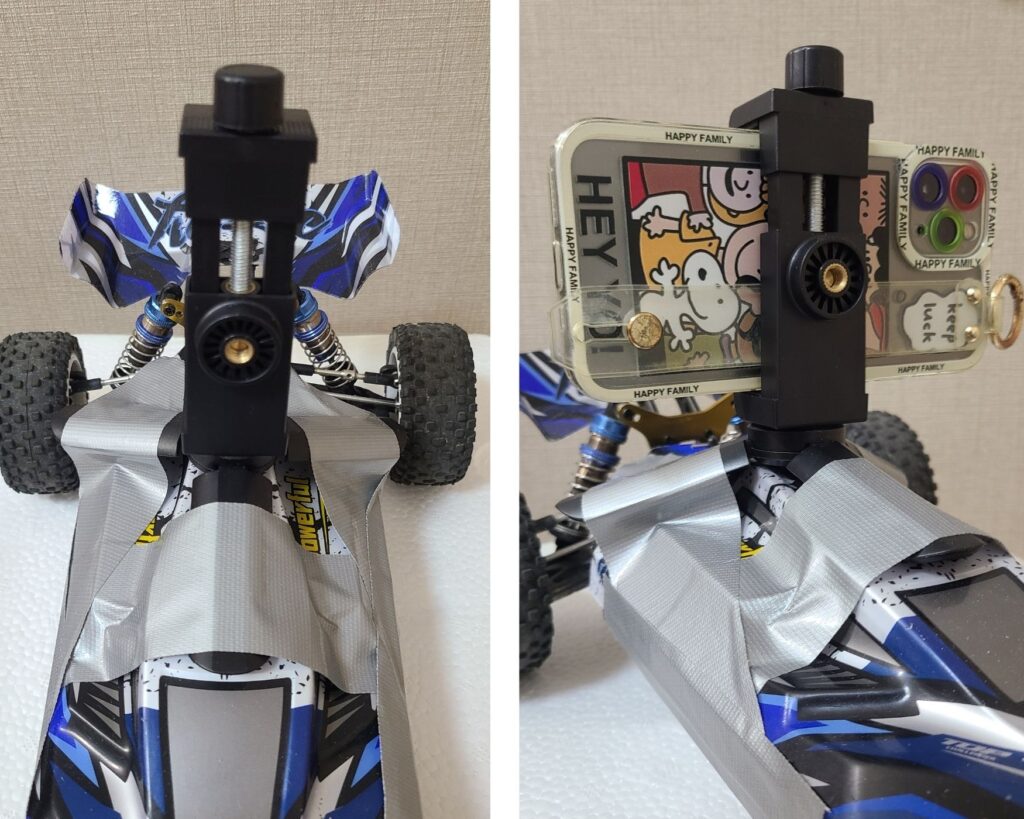
If you’re only interested in making FPV recordings of you blasting an RC track and not keen on viewing live FPV video, the solution is even simpler. You could either strap your loyal smartphone or action camera to your RC car. Here’s how.
Use smartphone or action camera for FPV
The easiest and cheapest way to FPV is to get a mini tripod with a phone (or action camera bracket) and duct tape the whole thing on your RC. Some smartphones and most action cams come with video stabilization capability and this makes this option a fitting solution.
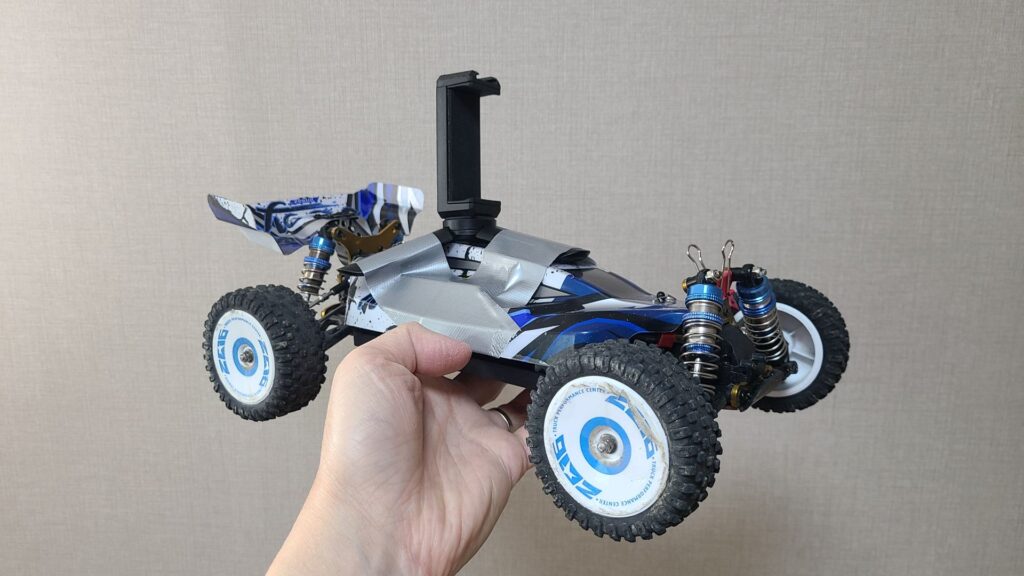
But here’s the catch. You might crash your car and so will your precious smartphone. So, remember to use a solid phone case with a screen protector. Or better still, duct tape the edges of your phone while you’re at it.
You should also consider getting a more robust phone bracket that comes with a nut to tightly secure your phone to your DIY RC camera rig.
Don’t forget to tape the sides of your car to the body shell to ensure the phone doesn’t tilt while you’re cornering. Check out the tutorial video below demonstrating how to do it using GoPro.
Another option is to buy a phone wrist mount that comes with an adapter that lets you mount your phone. You can wrap the entire vehicle with the velcro strap that comes with it. Adding washers below the hairpin clips and body shell can help keep the camera and shell level with the ground.
You do want to watch out for the extra weight that you’re adding to your RC. This is compounded by the loss of the low center of gravity if you mount a heavy smartphone higher on your car.
Pros:
- Easy, cheap and fast to install
- Make use of your existing gadgets
- Good quality video without much extra cost
Cons:
- Loss of stability to RC car
- Increase the overall weight on RC car if using smartphone
Use RunCam Thumb Pro
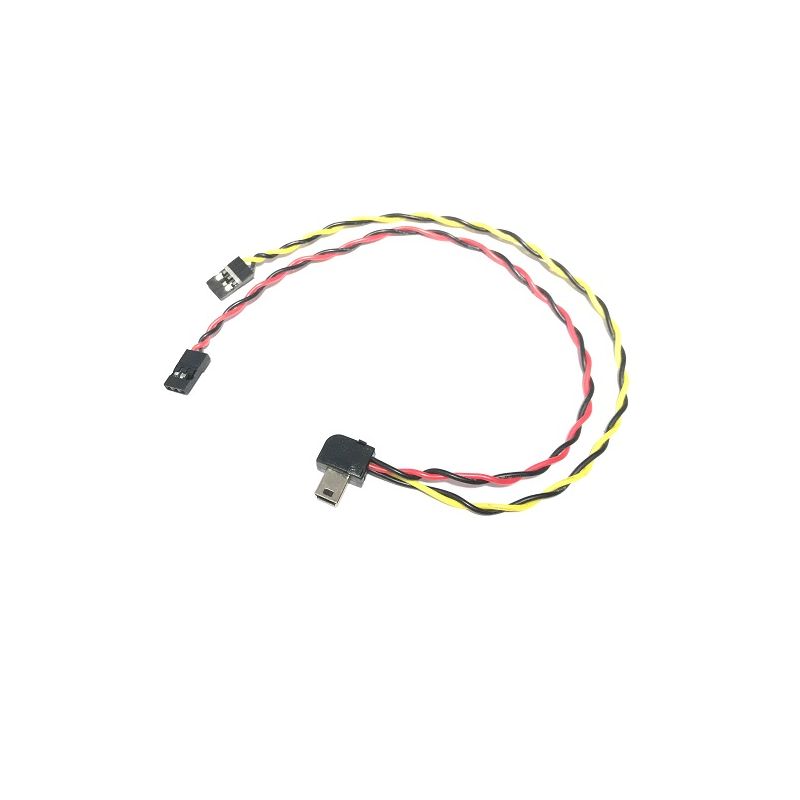
This is yet another good quality RunCam 4K product that is meant for drones but can compellingly be ported to RC cars. It boasts video stabilization that is almost a must for RC cars but the downside is that it can be quite complicated to install. For a start, you need to get a separate 4-pin power cable. The good news is that there’re lots of YouTube tutorial videos teaching you how to solder up. You may need a voltage regulator such as the Matek BEC, if you want to step down the voltage from your multiple S’s lipo battery to 5V or 9V.
Similar to RunCam Split, it supports a micro SD card (up to 256 GB) and 4K digital video recording. Its price is also more or less the same as its cousin. The good thing about this device is that it comes with a ready-made case. This means you don’t need to worry about exposing the circuitry of your camera or transmitter to the dirt or dust that we are so used to when driving RC cars. It even comes with an ND lens filter which doubles up as a lens cover. However, if you wish to further protect this precious camera, you can order additional case for it.
Conversely, it is slightly heavier (16g) than RunCam Split (10.2g) and larger in size. Mounting this camera on the body of your RC car should not be an issue since this camera comes with mounting legs. But do note that these holes are smaller than the ones used in GoPro or standard cameras. Nonetheless, they should let you mount with a screw and a nut on your RC chassis.
Pros:
- High-quality FPV camera with 4K digital recording
- Works with most analog FPV goggles
- Comes with video stabilization via Gyroflow
- Comes with its own case
Cons:
- The price is above $100
- May need to purchase additional wires and connectors
- May need to do soldering
Choosing Video Transmitters
If you opt to receive live video feed from your RC car to you via FPV goggles or UVC receiver, you need to include a video transmitter in your FPV setup. Its purpose is to broadcast the video images received from the camera to your goggles or monitor wirelessly. These transmitters are usually made out of a small printed circuit board (PCB) and attach with an antenna.
Matching the right frequency
Every video transmitter broadcasts its signals at a specific frequency. In the RC or drone world, you’d often see 5.8GHz or 2.4Ghz. These are the frequencies that are considered license-free, meaning manufacturers and you don’t have to pay a fee to your government to use them. This is why WiFi and Bluetooth devices also use these identical frequency bands.
It’s imperative that you choose the video transmitter that uses the same frequency as your FPV goggles or receiver.
Matching the right antenna
An antenna is crucial because its purpose is to radiate the video signal from your RC to your goggles or receiver. However, selecting the right antenna can be a headache since you’d often be spoilt with dozens of choices – linear, circular left-hand polarized, circular right-hand polarized, etc. So let’s keep things simple. For RC vehicles, a straight linear antenna is sufficient and you don’t necessarily need a mushroom or circular antenna that you often see on drones. The reason is your RC car often stays flat on the surface, unlike drones which would roll or perform loops which gives cause to use circular antennas.
The type of antenna you install on your RC and your goggles (or receiver) should be linear.
Choosing FPV Goggles
Most analog goggles work with any analog video transmitters. You just have to make sure they use the same frequency, which is usually 5.8Ghz. Goggles are often divided into these categories.
- Single screen – box goggles
- Double screen – binocular goggles
- With or without digital video recorder (DVR)
We do not cover the famous DJI goggles that looks like Kamen Rider because that headset is based on a digital system and much more costly than analog. We want to maintain a low barrier of entry.
FPV goggles are probably the most significant investment you have to commit when doing FPV. Prepare to fork out at least 100 dollars.
Single-screen FPV box goggles
Single-display headsets are basically one piece of screen attached to a head strap, with a couple of antennas protruding from it. They are often referred to as box goggles. It doesn’t come with two screens such as those you find in binocular goggles or your typical VR goggles.
It typically feels like looking into your mobile phone screen close to your eyes. Reminds us of the cheap smartphone VR adapter we saw at gadget stores. Some claim the experience of using these headsets is like being at the cinema.
They are always cheaper than the binocular counterpart since they only incur the manufacturing cost of installing one single screen.
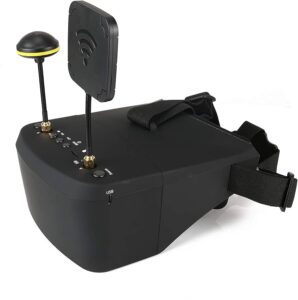
The most popular box goggles in the market has to be Eachine EV800D thanks to its low-price ( around $100) and adequate features. There are two versions – one with digital video recording (hence the “D” designation) and one without.
Double-screen FPV binocular goggles
Usually used by hardcore drone pilots, these headsets have two screens – one for each eye. They are more costly than single-screen goggles. Most claim they offer a more realistic VR experience than the box version but this claim is sometimes opinionated.
Popular binocular goggles out there are those from Fatshark, BetaFPV, SkyZone, Eachine and more but prepare to invest more than $200 or more to acquire a decent pair.
With or without digital video recorder (DVR)
Without a doubt, adding a video recording function to a headset will add to the cost. Thus, you would want to decide if you truly need a recorder to come with your FPV goggles especially when your camera setup may already have one.
You may choose to have a built-in recording system with your camera instead of the one with your goggles simply because you get far better video quality when recording it directly from your camera since the footage is pure digital. On the other hand, a digital recorder on a headset actually records your analog video in digital format. So you get lesser video quality which is from analog signal.