Pushing the RC envelope has always been a passion of mine, and this resonates with my love of flying dogfighting sims since the 90s. Now that FPV technology has matured, I have always wanted to add flight realism to my RC flying experience. Thus, I took the insatiable challenge to design a head-tracking FPV system for a small XK A280 P-51D Mustang that comes with a mere 560mm wingspan with the objective of keeping the overall cost low – below $65 for the airframe. With the US tariff looming, it is a perfect time to boldly go where no commercial RC has gone before. After months of trying, here are some hard learned lessons that I thought I must share.
You Can’t Augment the Stock Receiver
To create a head-tracking experience, you need two servos, which means two extra channels on your radio receiver. Most small RC airplanes come with built-in receivers, and these are usually bundled with servos for flight controls. Since we need extra servos for the panning and tilting, the only option we have is to augment the stock receiver with a satellite receiver. Not many low-cost micro planes come with this luxury.
With XK P-51D Mustang, I managed to source an old stock receiver that comes with an SBus port. This allows me to connect an additional receiver that provides the extra channels I needed.
Shorten Battery Life
Because we’re adding a significant amount of weight to the plane, you may need to upgrade your LiPo. With this upgrade, you are inherently adding more weight to the entire system. This ultimately would limit your flight time.
For my A280 Mustang experience, I needed to upgrade from 2s to 3s battery since flying with 2s feels too sluggish and underpowered. With 3s, I’m naturally adding more weight and this only offered me around 4 minutes of flight time. I could choose a LiPo with a higher mAh rating, but again, the extra weight will work against me.
It truly is a vicious cycle. I had encountered a couple of blackouts (black screen from video feed) when using lightweight but underrated LiPos that eventually caused my P-51D Mustang to dive straight into the ground and crash.
Loss of Center of Gravity
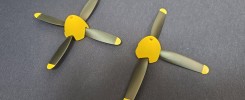
Two factors are at play when it comes to getting the perfect center of gravity (COG) – the new COG for the aircraft with the extra FPV camera system and the loss of COG when panning and tilting. For the latter, the camera movement can shift the weight your plane is bearing. That is why we need to cherry-pick the most suitable pan and tilt FPV mount that will not work against us while we are flying.
A camera mount with a low center of gravity is ideal, but one that is 3D printable isn’t necessarily available online. Thus, you need to roll up your sleeves and get ready to do some 3D designing.
Don’t Forget Aerodynamics
As much as low COG is crucial, aerodynamics is paramount. A small RC plane is sensitive to minute changes in airflow, and a bulky camera mount can act like a sail, dragging your plane back from thrusting forward.
Finding the best pan and tilt camera bracket is somewhat like treasure hunting. You have to try different designs until you find one that truly works and continues to work. Some designs are too fragile and break after a single crash. This is one of the most painful experiences of all.
I aimed for a design that allows me to perform basic aerobatics (vertical loops, aileron/barrell rolls and split-S) while maintaining smooth flight controls.
Digital FPV Matters When Flying Far and High
Here’s the truth about analog and digital FPV systems that no one talks about. In analog systems, objects look pretty good when they are near. But when they are far and tiny, you can’t work out the exact object you’re seeing. Because the object’s shape gets substantially distorted.
This is why a digital FPV system is almost a must when you’re flying long-range beyond freestyle. Digitized video images are crisper and sharper, which gives you a better view of your bird’s eye view.
But here’s the bombshell: digital FPV is not built for small aerial vehicles. The total weight of the DJI O3 unit is about 40 grams, while an analog all-in-one (AIO) FPV camera with VTX can weigh as little as 4 grams. A better analog unit with RunCam Phoenix SE 2 and Zeus Nano VTX weighs only 11 grams in total. That’s under half of O3’s digital weight.
Space is a Real Privilege
There’s always very little room inside a micro RC aircraft. I never imagined having to shred the body of my RC plane just to fit in my FPV system. In fact, it couldn’t fit in at all, so I had to mount it on top of the fuselage right on the cockpit. We’re talking about two servos with one camera and a VTX with the head tracking mount.
Let’s not forget about the larger LiPo battery we need to fit in to get the whole weight off the ground.
How About The Add-On Weight
How can I not write about the weight? But surprisingly, the weight isn’t much of an issue since I was using an analog FPV system rather than a digital variant with a 3s LiPo. The only digital system I flew on was with the HDZero Eco Bundle, but that excludes the pan and tilt servos and mount.
Conclusion
Building a head-tracking FPV system for a small and budget RC aircraft does not seem to be for the faint of heart. But whatever doesn’t kill you makes you stronger. After causing countless bruises and broken bones to my micro XK A280 Mustang, I finally took it to the air.
The successful maiden flight felt super satisfying. One could argue that I should have used a larger and more expensive airframe and FPV kit, but then, what’s the fun of building that when you know the only thing stopping you from glory starts with a “$” symbol?!